通过使用编辑器扩展,我们可以对一些机械的操作实现自动化,而不用使用额外的环境,将工具与开发环境融为一体;并且,编辑器扩展也提供GUI库,来实现可视化操作;编辑器扩展甚至也可以“补充”IDE缺失的一些内容,让IDE更加人性化。主要内容
- MenuItem无界面操作
- 窗口
- 优化内置操作
- 简单工具窗口
- Gizmos改造场景显示
一、MenuItem无界面操作
在assets文件夹下创建Editor文件夹,创建一个新的c#脚本;
using System.Collections; using System.Collections.Generic; using UnityEngine; using UnityEditor; public class BaseTest : MonoBehaviour { [MenuItem("德玛/第一个扩展")] static void debugLog() { Debug.Log("我是一个menuItem"); } }如图,这是我们第一个创建的扩展。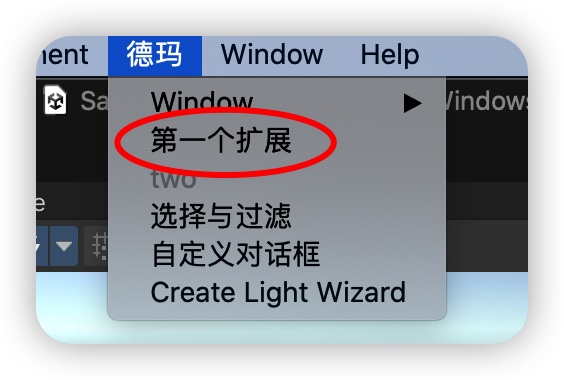
此时,如果我们需要获得一个当前场景选中的物品,则
需要通过Selection。将代码拷贝到当前创建的类里面:
// 设置第二个参数 [MenuItem("德玛/two", false)] static void testSecondParam() { Vector3 p = Selection.activeTransform.position; Vector3 v3 = new Vector3(p.x+1, p.y, p.z); Instantiate(Selection.activeTransform, v3, Quaternion.identity); } [MenuItem("德玛/two", true)] static bool testSecondParam2() { return Selection.activeGameObject != null; }通过这段代码,我们可以创建一个只有选择了一个场景物体,才会激活的按钮。
二、窗口
创建窗口需要通过EditorWindow作为基类,还是MenuItem为入口创建;
using UnityEngine; using System.Collections; using UnityEditor; //注意要引用 public class MyWindow : EditorWindow { [MenuItem("德玛/Window/NormalWindow")]//在unity菜单Window下有MyWindow选项 static void NormalWindow() { windowType = 1; MyWindow myWindow = (MyWindow)EditorWindow.GetWindow(typeof(MyWindow), true, "德玛标题", true);//创建窗口 myWindow.Show();//展示 } public void Awake() { //在资源中读取一张贴图 texture = Resources.Load("1") as Texture; } //绘制窗口时调用 void OnGUI() { EditorGUILayout.LabelField("选中"); EditorGUILayout.LabelField(EditorWindow.focusedWindow.ToString()); EditorGUILayout.LabelField("划入"); EditorGUILayout.LabelField(EditorWindow.mouseOverWindow.ToString()); } //更新 void Update() { } void OnFocus() { Debug.Log("当窗口获得焦点时调用一次"); } void OnLostFocus() { Debug.Log("当窗口丢失焦点时调用一次"); } void OnHierarchyChange() { Debug.Log("当Hierarchy视图中的任何对象发生改变时调用一次"); } void OnProjectChange() { Debug.Log("当Project视图中的资源发生改变时调用一次"); } void OnInspectorUpdate() { //Debug.Log("窗口面板的更新"); //这里开启窗口的重绘,不然窗口信息不会刷新 this.Repaint(); } void OnSelectionChange() { //当窗口出去开启状态,并且在Hierarchy视图中选择某游戏对象时调用 foreach (Transform t in Selection.transforms) { //有可能是多选,这里开启一个循环打印选中游戏对象的名称 Debug.Log("OnSelectionChange" + t.name); } } void OnDestroy() { Debug.Log("当窗口关闭时调用"); } }将上面的代码放入Editor目录下,通过德玛/Window/NormalWindow可以打开窗口。EditorWindow.focusedWindow获取当前焦点窗口;EditorWindow.mouseOverWindow获取当前鼠标划入的窗口;
各种生命周期函数均有打印,自行理会。
void OnInspectorUpdate() { //Debug.Log("窗口面板的更新"); //这里开启窗口的重绘,不然窗口信息不会刷新 this.Repaint(); }这段代码可以保证实时刷新显示。
三、优化内置操作
当路径放入GameObject的时候,会出现在右键菜单里面;
[MenuItem("GameObject/德玛/德玛Custom Game Object", false, 10]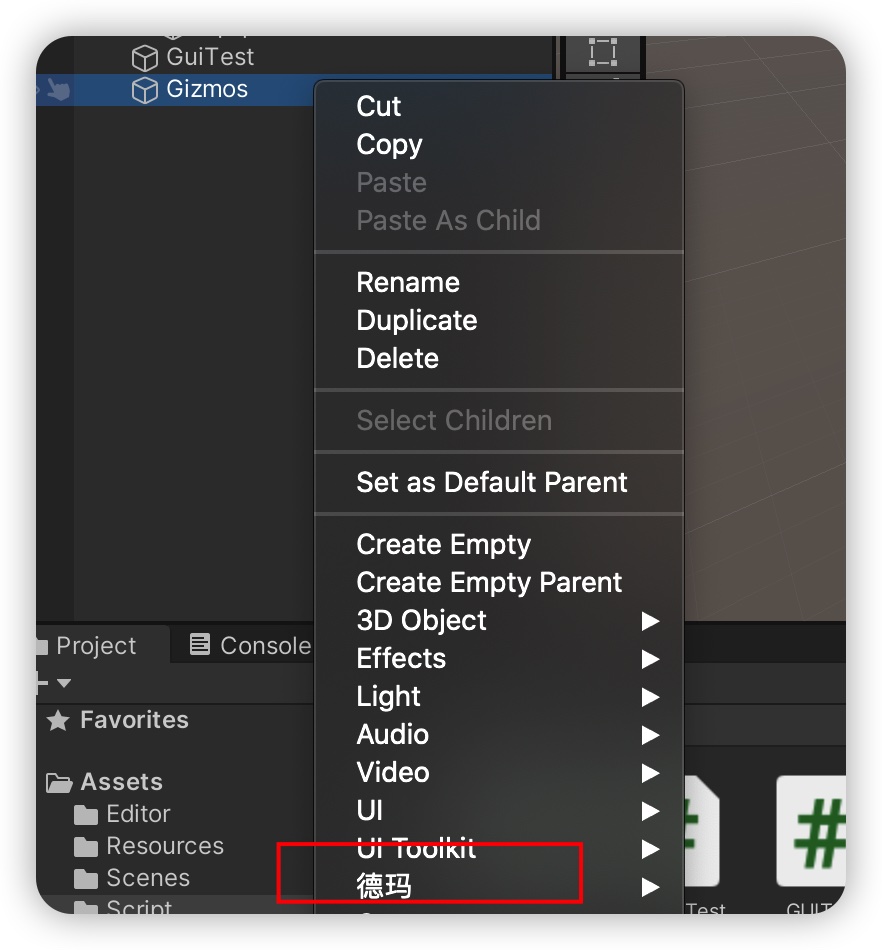
注解
当然,除了在Editor目录下添加各种扩展以外,我们可以通过给项目脚本添加注解的方式,来优化编辑器显示;
比如通过添加类似于Component的方式,来优化脚本的添加方式,点击后会直接将脚本添加到场景物体上。
将[RequireComponent(typeof(Rigidbody))]放入类头。我们将下面脚本放入到Assets/Scripts目录下面。
using UnityEngine; // 通过编辑器的Component菜单添加脚本 [RequireComponent(typeof(Rigidbody))] [HelpURL("https://docs.unity3d.com/ScriptReference/HelpURLAttribute.html")] [AddComponentMenu("德玛/添加德玛脚本")] public class ContextTesting : MonoBehaviour { [Header("属性标题")] [Multiline(3)] public string name2; [Space(100)] [Tooltip("用于设置性别")] public string sex; [HideInInspector] public int p = 5; [Range(1, 100)] [Tooltip("Health value between 0 and 100.")] public int health = 0; /// Add a context menu named "Do Something" in the inspector /// of the attached script. /// 给当前脚本添加右键内容 [ContextMenu("德玛西亚")] void DoSomething() { Debug.Log("德玛西亚打印"); } // 给属性添加右键 [ContextMenuItem("重置属性为空", "ResetBiography")] public string playerBiography = ""; void ResetBiography() { playerBiography = ""; } }我们发现,我们可以想组件一样的添加脚本了!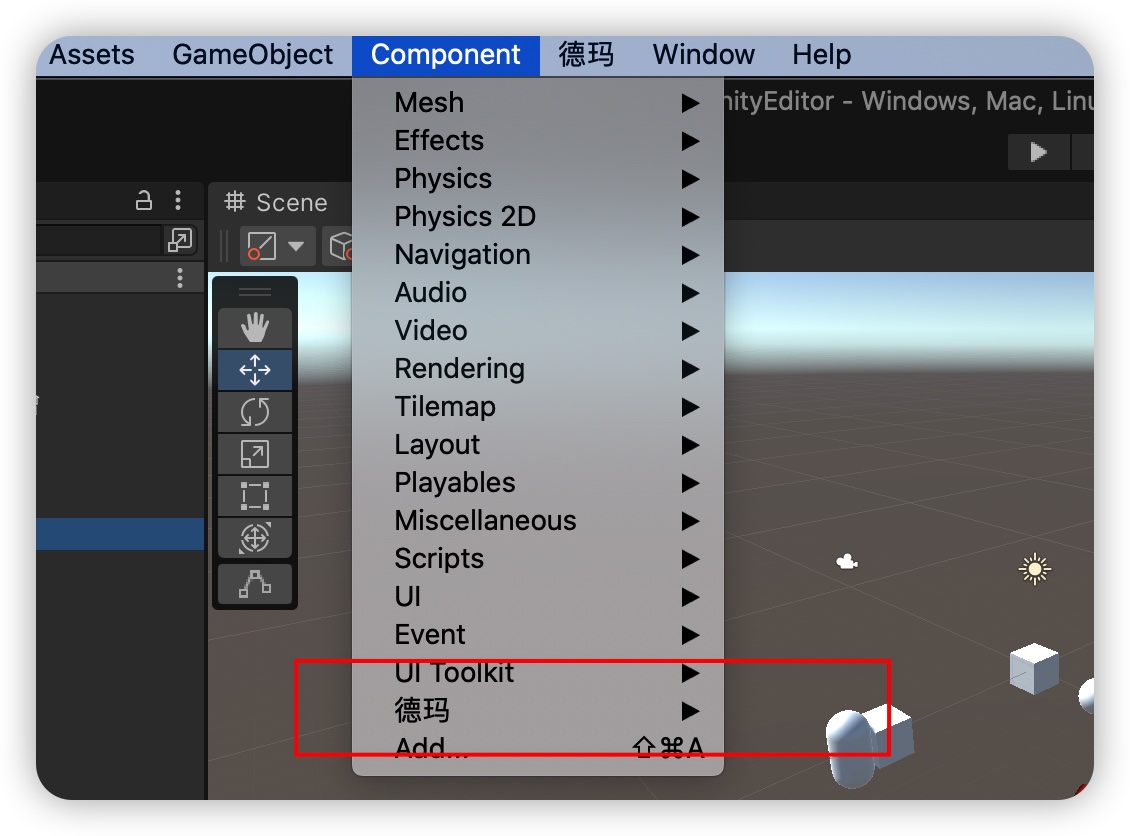
在Inspector目录我们也注意到当前脚本属性的显示也发生了变化;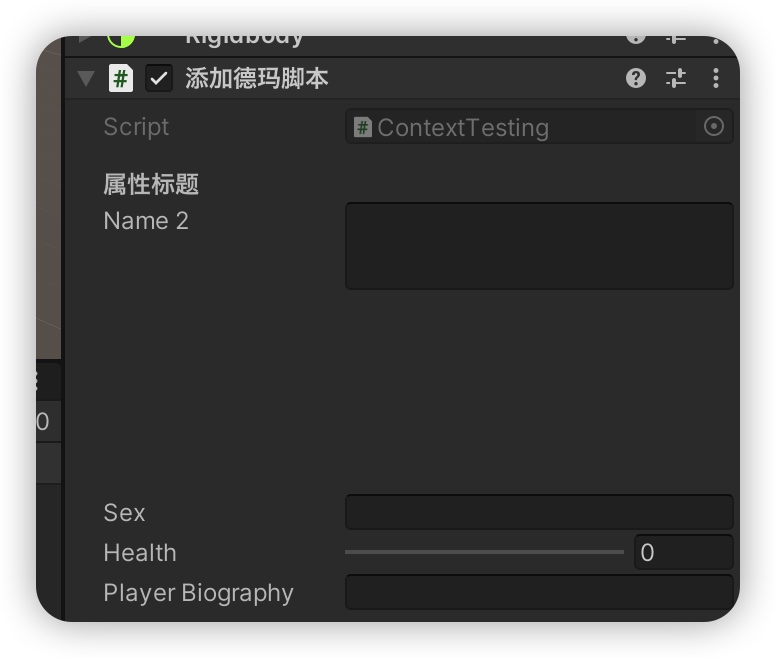
在Inspector上,我们也多出来一个Rigidbody组件。
美化项目脚本的属性显示
在Assets/Scripts下面创建MyPlayer
using UnityEngine; using System.Collections; public class MyPlayer : MonoBehaviour { public int armor = 100; public int attack = 100; public GameObject equipment; }在Editor下面创建MyPlayerEditor:
using UnityEngine; using UnityEditor; using System.Collections; [CustomEditor(typeof(MyPlayer))] public class MyPlayerEditor : Editor { SerializedProperty attack; void OnEnable() { attack = serializedObject.FindProperty("attack"); } public override void OnInspectorGUI() { serializedObject.Update(); EditorGUILayout.IntSlider(attack, 0, 100, new GUIContent("攻击力")); ProgressBar(attack.intValue / 100, "攻击力"); serializedObject.ApplyModifiedProperties(); } private void ProgressBar(float value, string label) { Rect rect = GUILayoutUtility.GetRect(18, 18, "TextField"); EditorGUI.ProgressBar(rect, value, label); EditorGUILayout.Space(); } }观察Inspector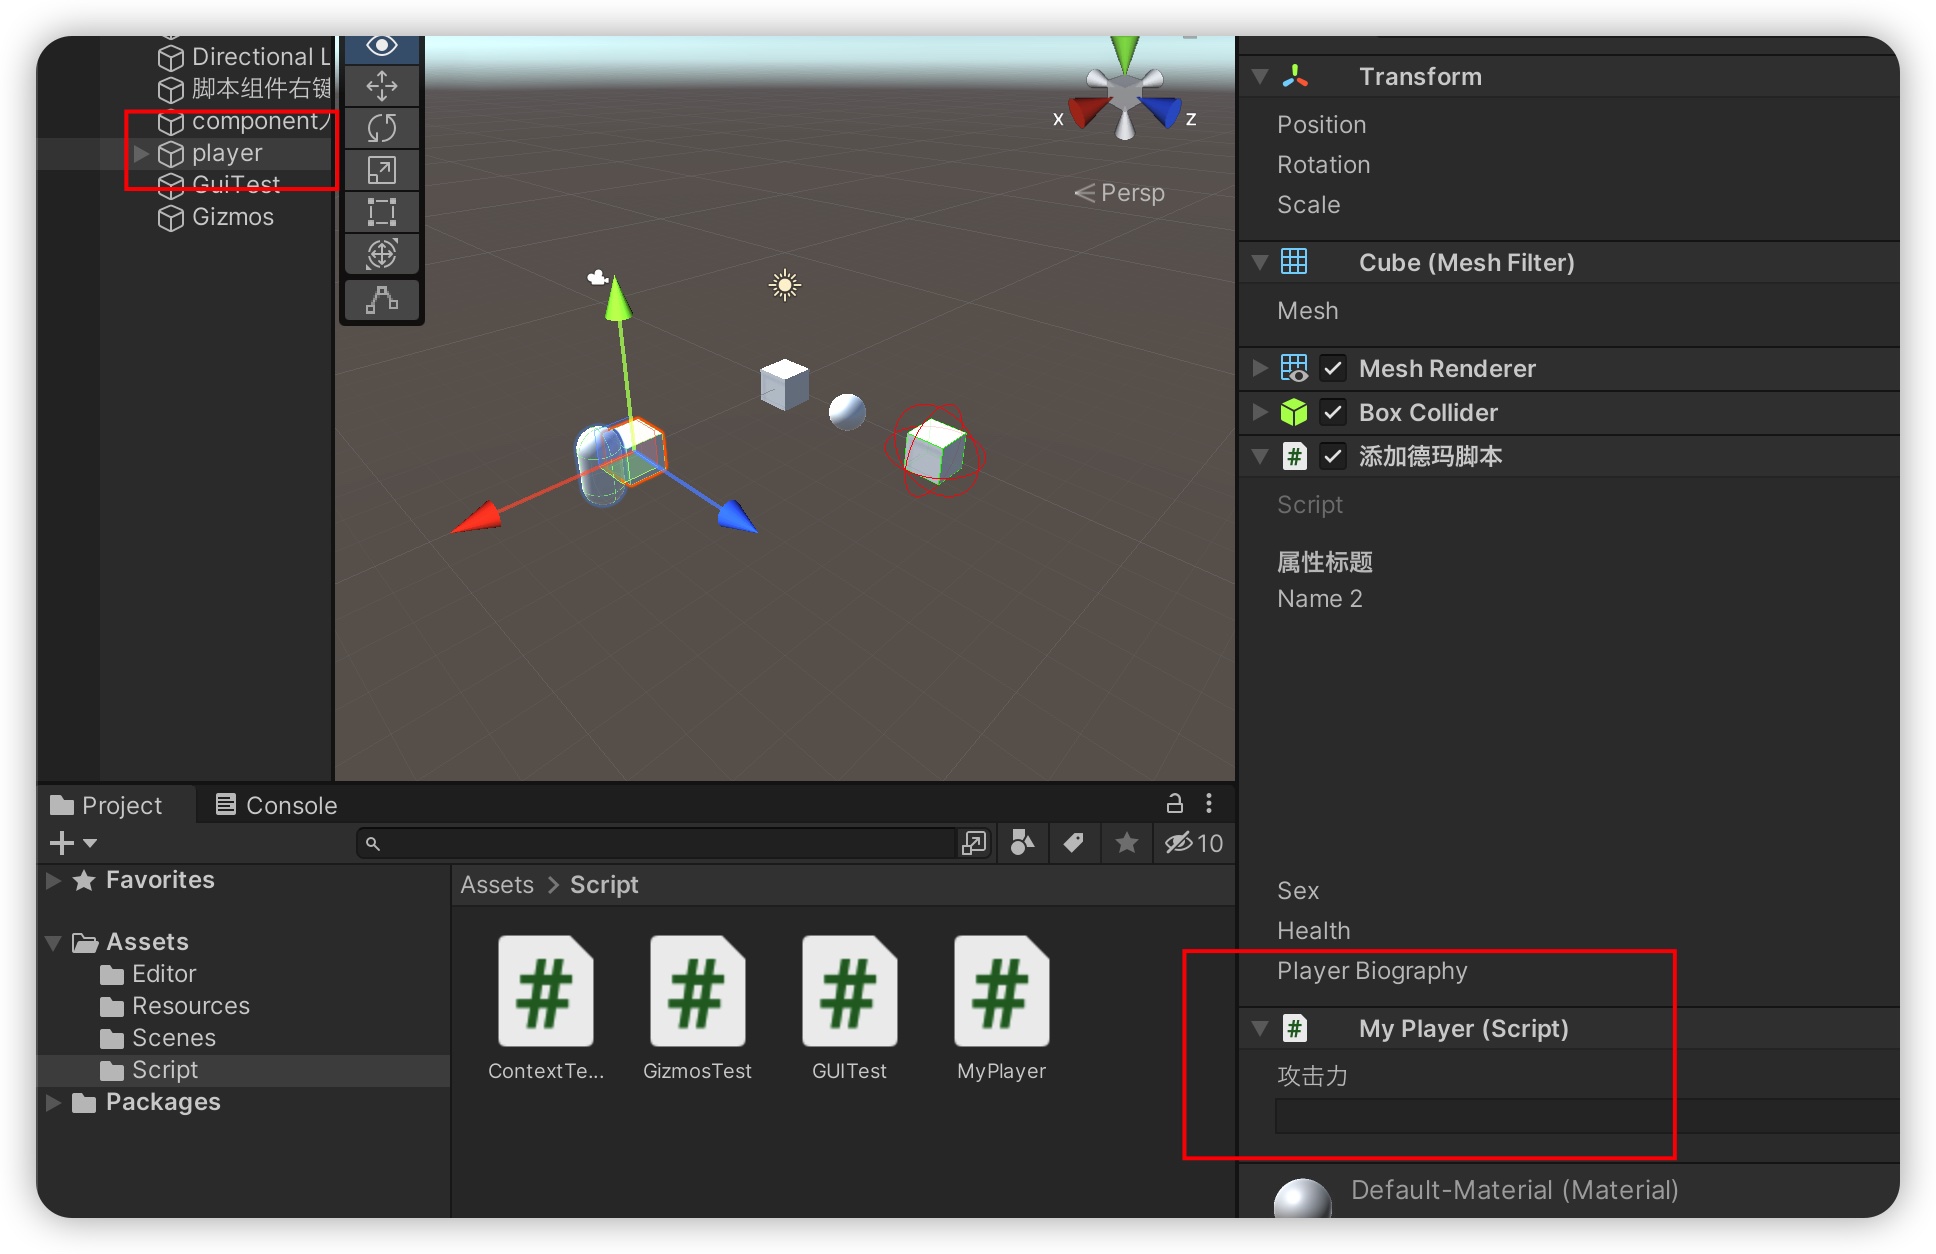
简单工具窗口
一个简单的确认窗口
using UnityEngine; using UnityEditor; public class MyEditorUtilityTest : ScriptableObject { [MenuItem("德玛/自定义对话框")] static void CreateWizard() { if (EditorUtility.DisplayDialog("对话框标题", "对话框的消息", "OK", "取消")) { Debug.Log("OK被点击"); } else { Debug.Log("您没有点击OK"); } } }显示如下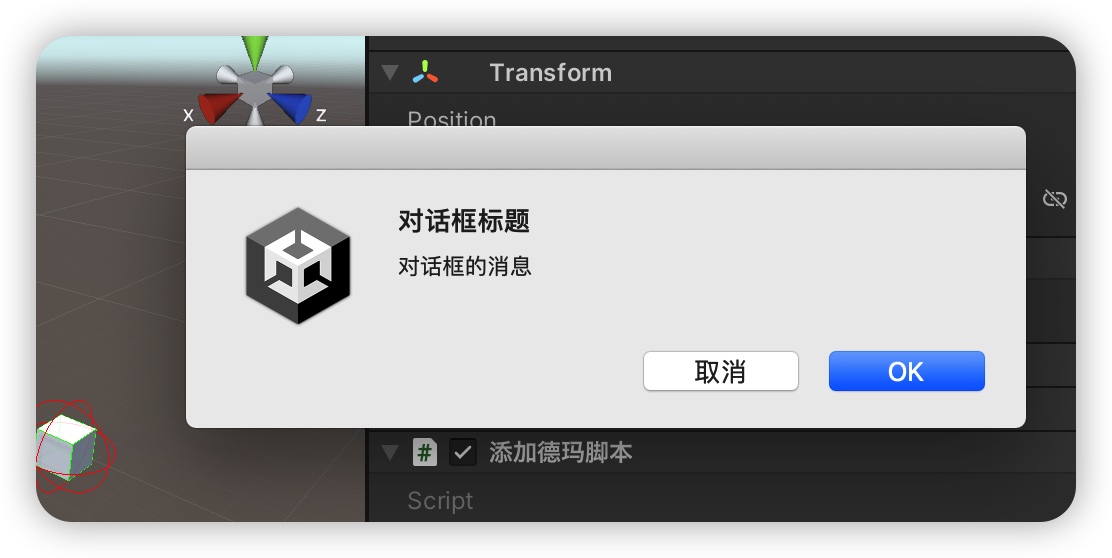
Gizmos改造场景显示
我们可以改造物体在场景中的显示;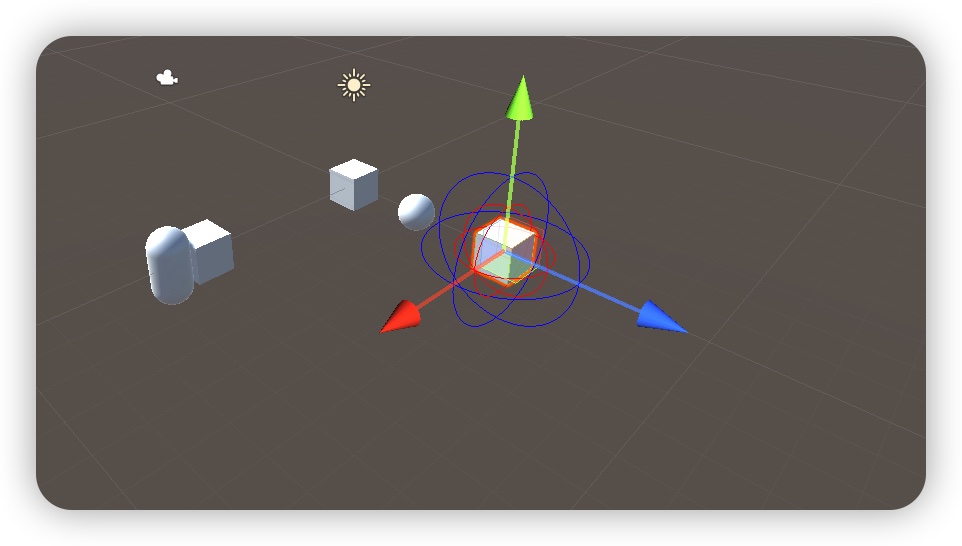
如下代码
其他
通过上面的案例,我们大致了解了Unity编辑器扩展的基本内容,通过这些已经可以实现很多功能了!
热门文章
- 11月11日 | Clash Verge每天更新20.8M/S免费节点订阅链接
- 2月1日 | Clash Verge每天更新22.1M/S免费节点订阅链接地址
- 1月19日 | Clash Verge每天更新21.8M/S免费节点订阅链接地址
- 11月30日 | Clash Verge每天更新22.7M/S免费节点订阅链接
- @RequestBody总结相关
- 1月12日 | Clash Verge每天更新21.2M/S免费节点订阅链接地址
- Glance基础服务运维_在线工具Live2D
- 1月15日 | Clash Verge每天更新21.7M/S免费节点订阅链接地址
- SpringCloud集成Sleuth和Zipkin
- 分享两个实用的shell脚本